Welcome! I'm Cookie's Mom. You can learn all about Cookie and why I blog here: About Cookie's Chronicles. If you're new here, you may want to SUBSCRIBE TO MY RSS FEED. Thanks for stopping by! Pull up a beach chair and be my guest, won't you?
Showing posts with label food and drink. Show all posts

Sunday, April 13, 2014

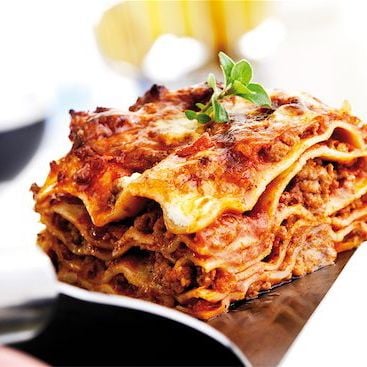
Mama's Lasagna
made gluten-free, of course, and with a reduced glycemic index option

An aunt recently exclaimed about my lasagna that it was the best lasagna she has ever had. That's high praise considering it had been in the freezer for a year! We haven't eaten dairy in about that long, so it just sat there. I finally gave it to someone who would love it. I thought, since I am sharing the recipe with her, I would share it with you all too!

Photo source: Chatelaine.com

My mama's lasagna is super easy to make. Her recipe goes like this:

Sunday, February 02, 2014

Gluten-Free, Dairy-Free, Low Glycemic Chocolate-Chocolate Chip Cupcakes

Recently, a friend's gluten- and dairy-consuming six-year-old called these cupcakes "The... best... cupcakes... ever!" They were an experiment based on a recipe for a cake that I have been making for a while now, combined with a favourite muffin recipe. I'm tempted to call these muffins because they're so healthy, but I'll resist and call them what they taste like: "The... best... cupcakes... ever!"

Gluten-Free, Dairy-Free, Low Glycemic Chocolate-Chocolate Chip Cupcakes

Based on the Chocolate Cake recipe from the Pulse Canada recipe booklet Pulses and the Gluten-Free Diet, with substitution for white sugar


Monday, December 09, 2013

Gluten-free, Dairy-free Chai Spice Cookies

Here is another recipe reworked for those who can't have gluten or dairy. I recently attended an Epicure party and fell in love with the Chai Spice. I knew right away that I wanted to use it to make cookies. My six-year-old loves these cookies without the powdered sugar coating.

Gluten-free, Dairy-free Chai Spice Cookies
Adapted from this recipe for Chai-Spice Cookies


Prep time: 15 minutes
Baking time: 15 minutes
Yield: ~ 36 teaspoon-sized cookies

These cookies contain:

vegan butter (oils of palm fruit, canola, olive, soy, flax), coconut palm sugar, gluten-free flour blend (brown rice, tapioca, arrowroot and sorghum flours, xanthan gum), soy, spices and salt

These cookies do not contain: 
gluten, dairy, or white/brown processed sugar (unless coated in powdered sugar)

Ingredients:

Directions
  • Preheat oven to 350°F
  • Beat vegan butter with coconut palm sugar and vanilla in a medium bowl or mixer until well blended. Stir in the gluten-free flour blend, chai spice and salt until just combined.
  • Scoop and roll dough into small teaspoon-sized balls and place about an inch apart on two large baking sheets lined with parchment paper or silicone mats. Bake until lightly golden, approximately 15 minutes. Do not overcook or they will be too dry.
  • If desired, roll warm cookies in powdered sugar. Let cookies cool completely on a rack.
  • Store in an airtight container. These cookies freeze well.

Admittedly, these cookies do taste best rolled in powdered sugar, but I love them without as well. They would work just as well with Xylitol instead of coconut palm sugar if an even lower-glycemic sugar substitute is desired (click here to view the glycemic indexes of various sweeteners).

I hope you enjoy these lightly sweetened, deliciously spicy cookies. I'm having one with peppermint tea right now!

Sue

I'm linked up with:

Wednesday, November 20, 2013

Stock Your Freezer:
Nine Meals Under $3.00 Per Person!

This past Sunday, a friend came over and we worked hard for five hours to make this:


Well, in fact, we made more than what you see in this picture. This is just my half of what we made (and there's one chicken dish missing... 'cause we ate it right away)!

That's nine meals prepped for my freezer at a cost of $2.20 per person. Nine meals that, even with the addition of one or two side dishes and/or pasta, cost under $3.00 per person. Note that many ingredients, such as the tomatoes and chicken, were organic, so that's an amazing cost. The cost would have gone down even further if I had planned meals around sale items. Here's what I put in my freezer:

2 x Lemon chicken with carrots and olives (one not frozen because we ate it right away)
1 x Pepper-lime chicken
2 x Adzuki bean and yam burgers
2 x Tomato sauce
2 x Tomato sauce with meatballs that I prepped the day before (plus one more small batch of tomato sauce with meatballs just for mama... I'm dreaming of a delicious submarine sandwich...)

We also had some leftover boiled and mashed yam. I froze mine in one cup portions that I will use in muffins. We also made some mashed potato mounds that can simply be heated up to pair with a steak or one of the chicken dishes. We also had a couple of baked potatoes left over that can be defrosted, sliced and fried to accompany a nice weekend breakfast or breakfast for dinner on a busy night.

I have to say, this is really the way to go. I had a nice visit with a friend, we both stocked our freezers with a couple of weeks worth of meals and sides, we saved money and we freed up some time in the future. Having these meals ready to go means not having to spend an hour in the kitchen at the end of a long day. Yes, prep day was long and tiring, but it was just half of one day. It was also cheaper to prepare the food all at once - one trip to the store and no waste when you realize a meal you planned to make but had no time for has been in the fridge too long and needs to be thrown out. There is some work to do ahead of time to choose recipes, decide how many batches you will make, create the grocery list, buy the groceries and prep some of the food. For example, I boiled and mashed the yams the day ahead and my friend cooked the beans ahead of time. To me, it was totally worth it to not have to ask or answer the question, "What's for dinner?" for at least a couple of weeks!

You can find the recipe for the Roasted Chicken And Carrots With Olives And Lemons here:


Happy cooking!

Sue

I'm linked up with:

Tuesday, October 22, 2013

HypoAllergenic Cooking: Homemade Sub Saves the Day!

If your a mom of a kid with allergies, you will understand why today was a big day for us.

Jack's school had another "special lunch day". While most parents might welcome the opportunity to pay a few bucks and order a meal for little Jimmy that they don't have to prepare or pack, for those of us with kids with allergies, it's a recurring nightmare.

I get that our schools want to treat our kids and to provide what they feel is healthy food, but what if it's not only not healthy for your child it could make him sick or even kill him? It's tough to get excited about a special lunch day that your child can't participate in. Will he feel left out? Will he be made fun of?

If you are the mom of the child who can't have that special treat, you know that you will do almost anything to make it up to your child, however irrational that behaviour might be.

Would you like a pony, honey?

Perhaps that's overkill.

You will at the very least make your child, from scratch if necessary, something that is as similar as possible to what the other kids are eating. If it's going to be different than it helps if it is also better.

Today was special lunch day at Jack's school. The caterer? Subway. Does subway have a gluten-free sub bun? Oh, no. Can you buy a gluten-free sub bun anywhere on the planet? I have yet to see one.


So, what do you do? That's right. You make one from scratch. And then you toast it just so, pile turkey slices on it and bacon (no else's will have bacon on it) and all sorts of lovely veggies, hold the dairy. Next you put it in a special container (no one else has a special container)...

and it is a beautiful thing to behold:


I made two sub buns so that I could have one of these gorgeous sandwiches today too! 

The recipe that I used for the sub buns is a hamburger bun recipe from a Donna Washburn cookbook called The Gluten-Free Baking Book. If you are new to gluten-free baking, pick up one of her books. Every one of her recipes just works, which is not the case for all gluten-free recipes. I have been using this recipe for a couple of years now. I made substitutions to remove dairy and sugar. The adapted recipe is below.

I used this perforated bun form which I ordered from the Canadian Celiac Assocation. This type of pan helps release moisture so that baked goods are not soggy on the bottom. I doubled the recipe to make two hamburger buns, two hot dog buns and two sub buns. 


Sadly, The CCA no longer sells this pan. If you see it anywhere, please let me know as I would love to buy another one! I have seen similar pans for baking just one type of bun that would also work well.

When Jack came home from school today, I asked him how he enjoyed his sub. He said it was DElicious! He went on and on about how good it was, and I had to fight back the tears of joy. If you have a kid with allergies, you get this. A successful meal is a big deal!


Bon appétit!

Gluten-free, Dairy-free, Sugar-free Buns
(great for hamburger, hot dog and sub buns)
Adapted from the Hamburger Bun recipe by Donna Washburn
The Gluten-Free Baking Book: 250 Small-Batch Recipes for Everything from Brownies to Cheesecake
page 99

My changes and notes are in italics below.

If using a perforated non-stick pan like the one above, no pre-greasing is necessary. Otherwise, lightly grease a pan large enough for 4 hamburger buns, or 4 hot dog buns, or 2 sub buns. (Double this recipe to fill the form pictured above to make 2 hot dog buns, 2 hamburger buns and 2 sub buns.)

Ingredients

1 cup brown rice flour
1/3 cup potato starch
1/4 cup tapioca starch
2 tbsp Xylitol (or preferred 1:1 granulated sugar replacement)
2½ tsp xanthan gum
1 tbsp bread machine or instant yeast
1 tsp salt
1 large egg *
1 large egg white *
2/3 cups non-dairy milk (rice milk works well)
2 tbsp vegetable oil (I use cold-pressed olive oil)
1 tsp apple cider vinegar

* For vegan diets, substitute 1½ tbsp ground flax seed + 4½ tbsp water

Directions

  1. In a bowl or plastic bag, combine brown rice flour, potato starch, tapioca starch, sugar-substitute, xanthan gum, yeast and salt. Mix well and set aside.
  2. In a separate bowl, using a heavy-duty electric mixer with paddle attachment, combine egg and egg white (or flax seed-water mixture for vegan buns), non-dairy milk, oil and vinegar until well blended. With the mixer on its lowest speed, slowly add the dry ingredients until combined. Stop the machine and scrape the bottom and sides of the bowl with a rubber spatula. With the mixer on medium speed, beat for 1 minute or until smooth.
  3. Spoon dough into prepared cups of pan, dividing evenly. Flatten tops slightly. Let rise in a warm, draft-free place for 45-60 minutes or until dough has almost doubled in volume. [If desired, sprinkle the tops of the buns with sesame seeds before the dough rises.] Meanwhile, preheat oven to 350°F (180°C).
  4. Bake for 15 to 20 minutes or until internal temperature of buns registers  200°F (100°C) on an instant-read thermometer. Remove from the pan immediately and let cool completely on a rack.

Doubles and freezes nicely.

Note: This is a sticky dough. It is difficult to press into moulds, BUT the result is really worth it, and if you make a point of exaggerating how challenging it is to mould the dough, your sweet child (spouse, significant other, etc) may make you a special treat to thank-you for your efforts. Mine was sliced apples and segments of mandarin orange. :)

Thursday, October 17, 2013

HypoAllergenic Cooking: Gluten-Free and Dairy-Free Spaghetti Pizza Pie

I recently stumbled across this recipe for Spaghetti Pepperoni Pie and thought, I can easily convert this recipe and make a delicious gluten-free, dairy-free one pan meal for the family... so I did!

Doesn't this look yummy?


Gluten-Free Dairy-Free Spaghetti Pizza Pie
(adapted from this recipe for Spaghetti Pepperoni Pie)

Total Preparation Time: 1 hour 
Actual Cooking Time: 40 minutes
Number of Servings: 6-8
Special Features: Gluten-Free, Dairy-Free, Sugar-Free (unless an ingredient in packaged breadcrumbs or bottled pasta sauce)

Ingredients:

1/2 pound gluten-free spaghetti, broken into thirds
1/3 cup gluten-free breadcrumbs (I used Kinnikinnick Panko Style Breadcrumbs)
1 Tbsp gluten-free italian seasoning (see my recipe below)
1 tsp salt
2 cups pasta sauce
1 cup Daiya Mozzarella Style Shreds
4 ounces gluten-free sliced pepperoni or salami, chopped
4 large eggs, lightly beaten
3 Tbsp grated Parmesan (some people are okay with Parmesan because it has little or no lactose, but if dairy is a problem for other reasons, substitute Daiya shreds or use ~ 2 tsp salt)

Directions:

1. In large saucepan of lightly salted boiling water, cook spaghetti 1 minute less than directed on package. Drain.
2. Mix breadcrumbs with italian seasoning and salt. Set aside.
3. Heat oven to 350 degrees F. Coat 10-inch nonstick skillet with nonstick cooking spray. If skillet handle is not ovenproof, wrap with aluminum foil. Coat with crumbs.
4. In bowl, combine cooked spaghetti, pasta sauce, Daiya mozzarella style shreds and pepperoni or salami. Stir in beaten eggs. Spoon mixture into prepared skillet.
5. Bake in 350 degree F oven for 30 minutes. Sprinkle with Parmesan, Daiya shreds or salt. Bake until cheese is golden brown or for about 10 minutes more. Let cool 10 minutes. Cut into 6-8 wedges. Serve with cut up fruit or a light green salad.

Easy peasy, right? Even my picky six-year-old liked it!

If you don't have or don't want to use pre-packaged italian seasoning mix, here are the ingredients for my homemade version. Just mix all the ingredients together and store in a spice jar or sterilized baby food jar in a cool, dark place. It should last for at least 6 months.

Italian Seasoning Mix

3 Tbsp dried basil
3T dried oregano
3T dried parsley
1 tsp garlic powder
1 tsp onion powder
1 tsp dried thyme
1 tsp dried rosemary
1/4 tsp black pepper
1/4 tsp red pepper flakes

Bon appétit!


I'm linked up with:

Sunday, September 29, 2013

Response to "Is True Happiness Possible Without Gluten?" by Jeffrey Steingarten, Vogue Magazine, September 27, 2013

In the article, "Is True Happiness Possible Without Gluten?", the author outlines his views on gluten and those who avoid eating it. It's worth a read since it represents views I have heard expressed by others. A caution though: If you have any sort of food intolerance or dietary restrictions (particularly gluten or lactose), it may irritate you at least as much as the author is irritated by those who avoid gluten.

Here is my response to the author of this article:

That last phrase, "who am I to judge?", is interesting and exactly what I kept wondering the entire time I read your article, Jeffrey. Who are you to make such bold and ill-informed statements about both gluten intolerance (as well as lactose intolerance) and gluten-free food? I had to 'Google' you to learn that you are the Vogue food critic and have been for some time. I assume that is why you feel you are in a position to judge such things as the eating habits, preferences and dietary requirements of others. The last phrase is interesting because you do nothing BUT judge those who choose not to consume gluten for whatever reason. 
The article was well-written, yet, despite your attempts, not well enough researched. You have not sampled enough gluten-free food to state that, "If you can’t eat gluten, then you can’t eat" the excessively lengthy list of food items you provided. That's simply not true. I have eaten and prepared extremely tasty gluten-free versions of most if not all of the things you listed. While you did as good a job as most people - which does not say much - of describing celiac disease and it's relationship to gluten, you make it clear that you are not well-informed about the seriousness of either lactose intolerance or gluten intolerance. 
I'm not going to go into the data that supports the avoidance of gluten for a very large group of people with ailments outside of the two you acknowledge (celiac disease and IBS). These are things you should have investigated prior to writing this article, but it is clear why you did not. It is clear that you did not intend to present an informed investigative report. Your intention was to complain about a group of people that irritate you. 
You finally - after doing much damage by labelling anyone who avoids gluten (and does not meet your narrow criteria) "food phobics" - acknowledge that the science does not agree with your view. Yet, you go on to include yet another population of people who may fake being gluten intolerant and close your article on that note as if to lend support to your close-minded view that gluten is good, healthy and even holy (unbelievable), while gluten avoiders are nothing but a bunch of annoying posers (excepting, of course, the population to whom you so graciously offered your respect - those with celiac disease). 
This is a witty article, and if I too was easily annoyed by other people's dietary choices I might have found parts of it amusing. 
In answer to the question posed by your article's title, "Is True Happiness Possible Without Gluten?", I suggest that for you the answer is clearly a resounding, No. You are not, however, in a position to judge (as you yourself acknowledge in your last phrase) whether this is true for others. A better title for this article would have been, "Why I people who don't eat gluten annoy me."

What do you think?
Should the author have done a little more research?  
Do you agree with me that he ought to live and let live? 
Do you agree with the author? 
Is anyone else hungry after all of this food talk?

Thursday, November 24, 2011

HypoAllergenic Cooking: Baked Apples

My American friends are celebrating Thanksgiving this weekend. A Happy Thanksgiving to you all!

If you're following a restricted diet, like me, you may not be able to indulge in some of the occasion's sweet treats, like pumpkin pie with whipped cream. But, you won't care once you have a taste of these delicious baked apples. They make for a very satisfying dessert, perfect for anyone on a restricted diet. See "Cook's Notes" for my suggestions and substitutions.

This recipe is adapted from the one at http://macrobiotic.about.com/od/desserts/r/SpicedApples.htm. I have provided the original recipe along with notes about substitutions I have made.


Recipe Details

Number of Servings: 4
Total Preparation Time: 1 hour
Actual Cooking Time: 45 minutes
Meal Type: Dessert
Special Features: Kids Love It, Kids can help make it, Vegetarian

Ingredients

4 Large firm, tart apples such as Crispin, Winesap, Granny Smith or Jonagold
1 tablespoon Lemon juice
1/4 cup Maple syrup or agave nectar
1/4 cup Golden raisins
1/4 cup Finely chopped, toasted pecans or walnuts
1 teaspoon Ground cinnamon
1/4 teaspoon Nutmeg
1 cup Apple cider (or 1/2 cup water if not available)

Preparation
  1. Preheat oven to 350°C.
  2. Core apples, or cut in half and remove core
  3. Sprinkle with lemon juice.
  4. Place apples in glass or other non-reactive baking dish.
  5. Mix maple syrup or agave, raisins, nuts and spices.
  6. Fill apples, or top apple halves, with mixture.
  7. Pour apple cider into bottom of dish and cover with a lid or foil.
  8. Bake 25 minutes.
  9. Remove foil, baste apples with pan juices and bake, uncovered for an additional 10-15 minutes, or until apples are tender but not mushy.
  10. Serve warm or at room temperature.

Cook's Notes

If you are not allowed to have any sweetener, this can still be a very tasty dessert. Just leave out the maple syrup or agave nectar. If you are allowed to have some other sweetener, such as local or raw honey or stevia, use it.

Many varieties of apple work in this recipe. Just adjust the baking time to suit your taste. I have enjoyed both Orin and Honey Crisp varieties.

If you can't have dried fruit, you can use fresh cut up grapes instead of raisins.

Almost any nut will do, so substitute to taste or for variety. I have enjoyed both almonds and hazelnuts, raw and roasted, in this recipe.

Apple juice works just as well as apple cider, but I typically just use water.

I like a little more cinnamon in mine. You can also poke each apple with a cinnamon stick for extra cinnamon flavour and aroma.

Note that due to the altitude where I live, and/or possibly my old clunker of a stove, I need to cook these at 375°C for 35 minutes covered and an additional 15 minutes uncovered. Once you've made them as per the recipe, play around with temperature and time to get the result you want. Personally, I want the apples to be slightly crisp, but also want to be able to cut through the skin (I don't skin the apples, because there is so much goodness in the skin and I figure it holds the juice in them.)

I have been eating so many of these that I invested in a good quality apple corer, one that has a lever to release the core - highly recommended. I also recommend buying a set of four grapefruit spoons. These make cutting through the apple skins easier. Enjoy!

~ ~ ~ ~ ~ ~ ~ ~ ~ ~ ~ ~ ~ ~ ~ ~ ~ ~ ~ ~ ~ ~ ~ ~ ~ ~ ~ ~ ~ ~ ~

Friday, October 07, 2011

Honey? Is there any more cake?

A couple of weeks ago, Alison of Mama Wants This posted a recipe for Honey Cake. I decided that this would be the perfect thing for my son Jack and I to bake next.

Alison tried a different honey cake recipe, but she linked to this more complicated recipe, and that's the one I decided to try. (Alison, it really was pretty easy! Give it a try the next time. You'll love it!)

It makes a good amount, so I had some to share with neighbours. In fact, I made it into muffins to take to his preschool the next time we baked it and they were a HUGE hit!

I'll repost the recipe here for convenience, but the credits for this version go to Smitten Kitchen. This version is adapted from Marcy Goldman’s Treasure of Jewish Holiday Baking.

I made a few minor adjustments of my own which I noted below the recipe.

Majestic and Moist Honey Cake
from Smitten Kitchen
adapted from Marcy Goldman’s Treasure of Jewish Holiday Baking

3 1/2 cups all-purpose flour
1 tablespoon baking powder
1 teaspoon baking soda
1/2 teaspoon kosher salt
4 teaspoons ground cinnamon
1/2 teaspoon ground cloves
1/2 teaspoon ground allspice
1 cup vegetable oil
1 cup honey
1 1/2 cups granulated sugar
1/2 cup brown sugar
3 large eggs at room temperature
1 teaspoon vanilla extract
1 cup warm coffee or strong tea
1/2 cup fresh orange juice
1/4 cup rye or whiskey
1/2 cup slivered or sliced almonds (optional)

Fits in three loaf pans, two 9-inch square or round cake pans, one 9 or 10 inch tube or bundt cake pan, or one 9 by 13 inch sheet cake. I made mine in two full-size loaf pans plus two miniature ones.

Preheat oven to 350°F. Generously grease pan(s) with non-stick cooking spray. For tube or angel food pans, line the bottom with lightly greased parchment paper, cut to fit.

In a large bowl, whisk together the flour, baking powder, baking soda, salt, cinnamon, cloves and allspice. Make a well in the center, and add oil, honey, white sugar, brown sugars, eggs, vanilla, coffee or tea, orange juice and rye or whiskey, if using. (If you measure your oil before the honey, it will be easier to get all of the honey out.)

Using a strong wire whisk or in an electric mixer on slow speed, stir together well to make a thick, well-blended batter, making sure that no ingredients are stuck to the bottom.

Spoon batter into prepared pan(s). Sprinkle top of cake(s) evenly with almonds, if using. Place cake pan(s) on two baking sheets, stacked together (this will ensure the cakes bake properly with the bottom baking faster than the cake interior and top).

Bake until cake tests done, that is, it springs back when you gently touch the cake center. For angel and tube cake pans, this will take 60 to 75 minutes, loaf cakes, about 45 to 55 minutes. For sheet style cakes, baking time is 40 to 45 minutes.

Let cake stand fifteen minutes before removing from pan.

Cook's Notes from Cookie's Mom

I had to adjust the baking time, possibly due to the altitude here in Calgary. I suggest baking large loaves for 45 minutes (mini muffins for 20 minutes) and then checking them every five minutes or so.

I did not include the alcohol, because I thought the taste might not appeal to kids. I used well steeped Earl Grey tea. In fact I made two pots of this tea, added some honey and then refridgerated the rest. I sipped and served some as iced tea, and used some for future batches of this fabulous cake!

Jack and I left out the almonds for the batch of muffins we made for his preschool friends (his school is a 'nut free zone'). Many of the kids wanted seconds, so it's good this recipe has such a high yield!

This is one of my new favourite cake recipes. It's delicious and moist - a cross between a 'cake' cake and a tea bread, which means it can be enjoyed any time of day! It's a desert. It's a snack cake. It's a great addition to a brunch menu. It's a 'maybe just one more teeny, tiny slice'-in-the-middle-of-the-day-when-no-one's-looking good! Enjoy!
Friday, September 16, 2011

Guest Blogger:
Carla of Mrs. No No Knows
"Tips for Easy Back to School Lunches"

Today I am pleased to feature Carla of Mrs. No-No Knows! I'm always so grateful for her weekly menu plans and fabulous food ideas. Today Carla is going to share her tips on back-to-school lunches. 


When Sue asked me to write a guest post, I was flattered and excited! (Thanks Sue!!) Let me start by introducing myself: My blog is really a mish-mash of what my every day life is like - so I end up writing about something fun we did the day before, or the week before, I write about crafts and sewing, and I write about my little Miss No-No - but mostly I write about the food!!

I love good food and I know that you don't need to "break the bank" to have it. I believe that you can eat well on a budget and you can feed your family without resorting to processed foods or being in the kitchen all day long. We don't have time to make a meal that takes 3 hours (who has 3 HOURS to cook??? I don't and I'm guessing that you don't either). But, I don't think that your family's taste buds or health should suffer because of that. For those reasons, I write about awesome, healthy food that can be made, in about 30 minutes or less! Doing this for your family makes your life richer and your family's life better - and, really, what could be more awesome?

Since it's September and that means the start of school for most of us mommas, let's talk about lunches.

My pre-K toddler has a program at her school where they provide lunch, for an extra fee. I'm in the "business" of running my house, our finances, and taking care of everyone - that $4 lunch doesn't work so well in my business plan. And while corn dogs, small kids' sized pizzas, and chicken nuggets for lunch everyday would be her dream come true, it really doesn't seem like the most healthy of diets...and since I am actually doing some grocery shopping every week, and have food in my house, it seems like a small stretch for me to make her lunch for her.

There are many benefits to my making her lunch, including:
  • it costs less for me to take something from my fridge (that I have already bought) than for me to send her to school with $4 every day for someone else to make her something
  • I know WHAT exactly is going into her lunch
  • I have the assurance that (even if she doesn't eat the vegetables) there are vegetables in her lunch
  • and, I get to send a little surprise for her every day!

Making a to-go lunch for a little one every day can take some planning, but it's really easy when you get down to it. Even when I start from scratch, I can get her lunch together in no more than 10 minutes (I've timed it!). Even though I feel like I have a lot of things to do every day, I can squeeze out another quick 10 minutes, even if it's just barely! ;)

So here are some quick and easy tips to help you with your toddler or school-age kids' lunches. I use these ideas weekly and I know once you start using them, you will keep up with them. Not just because of the good feeling that you will have sending your little ones off with the nutrition that they need to fuel them for the day, not because it will take about as much time to make lunch as it does for you to hunt through your bag for another $4 or $5 to give them each morning, but you will be able to stick with this because it works!

Plan ahead. Sounds easy, right? I've read this everywhere: plan ahead, be prepared, make lunches daily, and on and on.... But, we have all been there.....It's not THAT easy to plan ahead these fabulous lunches each and every day. My little one, honestly, is happy with a PB and jelly sandwich daily. And, really, PB and jelly is healthy, full of protein and good carbs that will keep her full until her afternoon snack. So my first real tip is this:
  1. Find something that your kids LOVE. For mine it's those PB and jelly sandwiches. So, I pre-make them for her! I will make 3 or 4 instead of just making one, pop the extras in Tupperware, and put them in the freezer. On those days that I just can.not.find.the.time to make her lunch, I have a back-up. I can put one of the frozen sandwiches in her lunch in the morning and by lunch time, it's defrosted and ready to go. And I do that with a lot of things - if I cut up carrots or red peppers for dinner, I will grab an extra one or two and cut those up as well, divide them into good portion sizes in Tupperware and save them in the refrigerator for lunches. When I need a veggie for lunch, they are there and ready to go. I also do this with fruit, applesauce, rice or any other grain, beans, whole wheat pasta, and especially leftovers. Once you have a little arsenal of Tupperware containers in your fridge, you grab a couple (one from each food group) and have a complete lunch ready to go.

  2. Make it fun. If I send my little one with a sandwich, I use a cookie cutter to make it into something special. It might be a heart, a flower, or something seasonal. She never knows what she is going to get, and it's different each day. It's nothing elaborate, and it only takes another couple of seconds, but it sets her lunch apart from the other kids' lunches.

  3. Give them something to pick at. Kids love to pick and munch, talk for awhile, and then come back to their lunch. A little one with a burrito might not eat a lot of it, but a little one with carrot sticks or cucumber "chips" can grab some and talk and eat at the same time, they can share with friends, and then can eat what they want or how much they want without being overwhelmed by having to eat a BIG piece of something. I send edamame, beans, raisins, and other small pieces of fruit in her lunch. So, basically, what I am saying is - cut everything up!! :)

  4. Add an element of surprise. I think this makes my little one look forward to what could possibly be in her lunch each day (I put the thought that she may be sneaking a peek into her lunch bag early completely out of my mind!!). Anything, really, is appropriate - it's just a little "I'm thinking of you" surprise. Sometimes, I use silly bands or bracelets, stickers, a handwritten note that says "I love you", or I will just draw her a silly picture. It doesn't have to be elaborate - and that's the beauty of it - you can do something simple, but it will have a big impact on your kids.
I believe these are the basic "building blocks" of a healthy lunch. And I think as long as you get something from each food group into that bag, kids will eat! They might not eat as many veggies as you would like, but in the end they are getting good food, healthy food, and you are saving money (and now time) making lunch for them...it's an easier way for you to help your kids live a richer, fuller life.

So go ahead and pack those lunch bags, mommas - there's nothing to worry about, you've got the tools to get it under control!!

Here are some example pictures of lunches I have made for my little one (just so you can see the creative cookie cutting I do!!)

A word of warning: If you have older kids, like teenagers, all bets may be off here!!!

Have questions or comments? Come on by my blog, my FB page, or even Twitter and ask away!!! If you need help packing lunches, I'm here for you.
Tweet

Wednesday, September 14, 2011

Wordless Wednesday: Homemade Pizzas with Chef Jacques


~ ~ ~ ~ ~ ~ ~ ~ ~ ~ ~ ~ ~ ~ ~ ~ ~ ~ ~ ~

He's an olive fan like his mama! :)

Thanks to my fabulous friend, M, who gave me an inspiring BBQ pizza cookbook.

Wednesday, July 27, 2011

Wordless Wednesday: Chef Jacques


~ ~ ~ ~ ~ ~ ~ ~ ~ ~ ~ ~ ~ ~ ~
We've decided to let Jack pick one supper meal per week that we will all prepare as a family. This was his first selection: Silly face meat and potato pies!

Monday, June 06, 2011

The Case of the Missing Blueberries

Love blueberries? Check out this video. It will change the way you look at your favourite blueberry products.


To learn about the potential hazards of consuming artificial food colours, view this article. Probably best to avoid them.

In the video, Nature's Path cereals are mentioned. We have been eating only their cereals for a few years now, with a few fresh organic berries tossed on top. Nature's Path cereals are of very high quality and in addition to the benefits mentioned in the video - organic ingredients with no artificial flavours or colours - Nature's Path is a non-GMO company (you can learn about GMOs here).

If you're looking for genuine blueberry flavour, why not try... blueberries! Fresh or frozen they pack a powerful antioxidant punch! 

Healthy eating!

Thursday, June 02, 2011

Comfort Food: Cheddar Cheese Potage

Today I'm following another writing prompt offered by Mama Kat.

Prompt: Comfort food at it's finest. Share a family favorite recipe you loved as a child.

I don't know how much 'writing' is involved in this week's prompt, but after reading it I immediately thought of a recipe that I wanted to share with you all. My mother's broccoli cheese soup always made me feel cozy and warm on a cold day. I know it's spring and probably warm where most of you are, but today in Coldland it is cloudy, windy and a little chilly. The perfect day for mom's soothing soup!

Cheddar Cheese Potage

Source: http://friendseat.com/Gluten-Free-Broccoli-Cheese-Soup-Recipe

By: Cookie's Mom's Mama

A very cheesy and delicious soup. Mince the onions very finely if serving to kids. They'll LOVE it!

Total Preparation Time: less than 15 minutes
Actual Cooking Time: 15 to 30 minutes
Number of Servings: 4-6
Special Features: quick to prepare (under 30 minutes), kids love it, can be made ahead

Ingredients
  • 1/2 bunch Broccoli
  • 3 tablespoons Butter
  • 1/4 cup Onion, chopped
  • 4 tsp Chicken bouillon
  • 3 tablespoons Flour
  • 1/2 tsp Paprika
  • 1/2 tsp Dry mustard
  • 2 cups Milk
  • 2 cups Water
  • 2 cups Shredded cheddar cheese

Preparation
  • Steam (cook) broccoli and set aside.
  • Melt butter (or substitute oil) in large pan. Saute onions.
  • Combine dry ingredients in mixing bowl. Gradually add and blend in milk and water.
  • Add to pot and cook over medium heat, stirring constantly until soup boils and thickens.
  • Remove from heat and stir in cheese to melt. Stir in broccoli and serve. Garnish with a spoonful of grated cheese.

Cook's Notes

You can even use skim milk (or other milk such as rice or almond) to reduce the fat in this recipe, since it's so rich and cheesy! If you want to replace the chicken bouillon, use 2 cups of chicken stock instead of the water, and salt to taste.

Serve with crusty rolls and butter. Mmm.... soothing and delicious!

Enjoy!

Mama’s Losin’ It

Sunday, April 10, 2011

Sunday Treat: Peanut Butter & Pretzel Truffles

It's Sunday. Everyone is relaxing around the TV, or maybe you're finishing up some chores around the house. You're feeling a little peckish and you're craving something sweet. Sweet but healthy, you think. A piece of fruit? Well, not that healthy!

I have just the thing!

These Peanut Butter & Pretzel Truffles are sweet, and they're also packed full of important nutrients! They contain protein in the form of peanut butter and antioxidant power in the form of chocolate (the darker the better). They're also relatively easy to make. Enjoy!

Click here to view the recipe at Eating Well:
Peanut Butter & Pretzel Truffles

Source: Eating Well, http://www.eatingwell.com/recipes/peanut_butter_pretzel_truffles.html

Edited June 4, 2013 to update recipe link.

Wednesday, March 23, 2011

Eat a Rainbow!

Trying to figure out what to feed the kids can be a daunting task (see Lunch should be a four letter word), especially if we want to serve healthy meals. If we don't work at it, our kids could go days (weeks? months? a lifetime?) without ever eating a vegetable.

Lately, my family has been trying its best to eat a rainbow of fruits and vegetables every day. Canada's Food Guide recommends eating 4-10 servings of fruits and vegetables a day (see suggested daily servings by age). A serving is defined as one piece of medium-sized fruit or half a cup of fresh, frozen or canned fruit or vegetables (see examples of serving sizes). It is further recommended that we eat at least one serving of leafy greens and one serving of an orange fruit or vegetable every day in order to meet daily folate and vitamin A requirements (see Tips for Fruit and Vegetables).

Some of the ways we try to eat a rainbow every day:

http://www.thelazyvegetarian.com/eat-a-rainbow.html
We like fruit for breakfast and snacks. The only rule is that it has to be something we haven't already eaten that day. It's fun for Jack to remember what he's already had and to remember what we have in the fridge or pantry that he hasn't had yet.
example: strawberries or banana cut up into cereal for breakfast, grapes with a muffin for the morning snack, apple slices with crackers and almond butter for the afternoon snack
I try to include vegetables with the lunch and supper meals. Jack can choose between a salad and cut up vegetables. The same rule applies as for fruit. He needs to choose vegetables he hasn't had yet that day. He is also encouraged to pick at least two vegetables per meal that are different in colour.
example: carrots and celery sticks for lunch, red pepper and cucumber chunks for supper
http://www.5to10aday.com/en/fruits-veggies-primer/variety-colours

We try to eat foods from the five basic colour groups every day, and vary them day by day. What Color is Your Food? is a gorgeous article that outlines the properties of each of the five colour groupings. Kids can try creating sample menus by adding fruits and vegetables to meals. Here you'll also find tips on how to increase the number of fruits and vegetables you eat. Some of their suggestions that we like the best are:
  • Keep cleaned fruits and vegetables in the refrigerator — ready to eat.
  • Have vegetables with low-fat dip for a snack.
  • Drink 100% fruit juice instead of fruit-flavored drinks or soda pop.
  • Keep a bowl of apples, bananas and/or oranges on the table.
  • Choose a side salad made with a variety of leafy greens.
  • Add lettuce, onions, peppers and/or tomatoes to sandwiches.
  • Enjoy fruit smoothies for breakfast or snacks. 
  • Pack fresh or dried fruits for quick snacks.
The Mix It Up! web site also has some great tools and information about fruits and vegetables. You can download a colour chart, place it on your fridge and track how well you did each week eating the colours of the rainbow. For information about what to look for when buying, nutrition information and storage and preparation tips, see Fruits from A to Z and Veggies from A to Z. There are also some tasty looking recipes on the site.

http://www.todayiatearainbow.com/kids-zone/

If you're still having trouble convincing your kids to eat their fruits and veggies, check out this product: Today I Ate A Rainbow!™. Kids get a colourful chart, magnets, a bookmark, shopping list and story book, all designed to help them eat fruits and vegetables from each colour of the rainbow. There's also a great Kid's Zone on their website where kids can get colouring pages and play games.

Wednesday, March 16, 2011

Why do we enjoy that first sip of wine the most?

I've heard it said that the first sip of wine is the best. That seems to makes sense. After the first sip, your palette becomes accustomed to the flavour of the wine. Subsequent tastes might be less distinct, less powerful and potentially less enjoyable. 

Yesterday, I thought about this relationship between the initial experience of a thing and the thing's evaluation. I was in the car... alone. It's amazing what thoughts creep into my mind when it's not busy answering the deep questions of a preschooler, such as "Where does that truck live, mommy?; Does it talk?; Do you drive fast, mommy, or slow?;" and "Are there more mean cars or are there more nice cars?" These are all very complex questions that drive out any other thoughts I might try to think. Further, Jack's important questions about driving are especially hard to ponder while actually trying to drive a car. But I digress. 

Alone in the car, it occurred to me that many things seem to be the best of what they are when we first experience them. Think of a first kiss, the first few beats of a really great song, the first time you saw mountains/the ocean/Niagara Falls. All of these firsts are exhilarating or in some other way emotionally-charged. Is that the measure of quality we're talking about when it comes to our first sip of a wine? Does wine become less exciting the more of it we drink? That seems counter-intuitive. After all, wine contains alcohol!

Consider that when we taste something, we also smell it through olfactory nerves that travel to the brain (see How does our sense of smell work?). The first whiff of something is usually the strongest. After living with a scent for a period of time, it's power diminishes (sometimes, that's a very good thing). It is possible that if the first sip of wine is the best, it is not because of how it tastes, but rather because of how it smells. According to Jim LaMar (see Three Wine Myths), "A great deal of the pleasure of wine comes from smell," and I would wholeheartedly agree based on my own experience. I can spend several minutes just smelling the wine in my glass before taking a drink. LaMar writes, "The smells in wine are comprised of Volatile Organic Compounds." These compounds can evaporate very quickly. To experience the wine as fully as possible, you need to smell it as soon as possible after opening or decanting the bottle. Since we can smell by tasting, this might explain why the early sips of wine are the best, at least if we define best as being the most accurate representation of what's in the bottle.

How many of our exhilarating firsts are enhanced by the sense of smell? Certainly first kisses qualify. The ocean and Niagara Falls have strong smell components. One of the areas of the brain stimulated by smell is associated with memory (see From Tongue and Nose to Brain). Anytime we smell a familiar scent it can transport us back to an earlier time, reinforcing the memory and creating a still stronger attraction to the smell. This makes me wonder, if we enjoy that first sip of wine the most, is it really the wine that we are enjoying, or are we instead drinking in the memories that its scent evokes?

Whether that first sip of wine is the best sip may be debated. What we can likely say is that if it is taken soon after the bottle is opened in order to savour the wine's delicate aroma, the first sip is the closest representation of what is in the bottle. It may be argued that it provides the fullest experience of the wine. Part of that rich experience may result from powerful memories associated with the wine's aroma. Knowing that makes me appreciate wine even more!

À VOTRE SANTÉ!

Retrieved March 15, 2011, from http://www.trendir.com/dining-entertaining/glassware_bar/?start=10

Sunday, February 27, 2011

It's Sunday: Drink Your Greens!

Good morning! How is everyone feeling today? Anyone up late last night? Perchance, were any cocktails involved? Feeling a little sluggish? Well, I have just the thing to kick start your Sunday. It's a green juice, and it actually tastes very good. If you feel or look at all green yourself, you may want someone else to make this and then put it in an opaque glass for you. It is, afterall, green. Trust me though, it's yummy. It will cure what ails you, and give you an energy boost.

You'll need a juicer. You can make a smoothie instead using a blender, but the consistency will be different, and you'll probably want to add some ice.

This recipe is modified slightly from one my naturopath gave to me. She called hers "Green Lemonade".
3 or 4 leaves Kale
1/3 head Romaine Lettuce
1/2 Lemon
2 medium Apples
1 inch piece of Ginger, peeled
3 or 4 Celery Stalks
Wash everything. Cut items only if necessary to fit into juicer. A decent juicer will handle the apples whole without you having to peel or seed them. If you have a variable speed juicer, all the better. Juice the leafy greens on low, the 1/2 lemon on medium, and the rest on high. This will make about 2-3 cups. Serve and exclaim, "Oh, that looks disgusting yet is wonderfully delicious!"

You can drink this juice every day, though for maximum benefit you'll want to vary your greens, particularly your leafy greens. Try chard, spinach or other leafy greens, and substitute cucumber or green melon for the celery.

If you can only manage to make this once per week, save it for the day after your most exhausting day. It will help to cleanse and recharge your body.

Thursday, February 24, 2011

Now that's crisp!

It was -38 °C with the windchill when I got up this morning. For my American friends, that's -36.4 °F, almost at the point where our temperature scale numbers match (-40 °C = -40 °F). In other words, it was really #%*&ing cold outside. Luckily, it's warmed all the way up to -35 °C with the windchill.

We're staying home today. Jack is sick. Yes, again, or still. I'm not sure which. The school has a pretty strict policy about keeping kids away if they have stuff running from places where it shouldn't, which is interesting considering that the school is probably the place where he got sick in the first place. Our precious little germ carriers. Where would we be without them? Actually... let's not go there just now.

Instead, I'd like to share my favourite home remedy with you all.
Cookie's Hot Cold Drink (it's the best I can come up with today - I'm entertaining suggestions for a new name):
  • heat water to just boiling (that's about 85 °C here due to our higher elevation)
  • put 1 teaspoon apple cider vinegar and 1 Tablespoon good quality honey in a glass
  • pour about 1/2 cup of hot water over honey/cider mixture to melt
  • add freshly squeezed orange juice from 1 orange
  • test to make sure it's not too hot and serve
NOTE: Apple cider vinegar helps control cold symptoms such as a runny nose and watery eyes. This small amount won't be noticed by your little one.
March 4, 2011-Edited to add: Honey provides relief to a sore throat. It also helps to loosen phlegm and move it up the throat and out of the body. I have not tried it yet, but some people claim that Manuka honey is the best as it has strong anti-bacterial properties. See benefits-of-honey.com for more information about honey's many healing properties. NOTE: Do not give honey to children under the age of one (some say 18 months). There is a small risk of botulism, a very serious illness that can cause paralysis, since some honeys contain trace amounts of botulinum spores.
I'd love to hear your home remedies too.

Keep well! I'm going to go turn up the heat and pretend I live someplace more hospitable. Someplace where rabbits don't freeze in mid-sprint.

Tuesday, February 15, 2011

Lunch should be a four-letter word.

I don't know how I felt about lunch before my son came along. I don't think it held any special power over me. I'm pretty sure I just ate stuff, without thinking too much about it. I may have enjoyed the midday meal BK (before kids). I may have even uttered the phrase "Let's do lunch!" with a carefree jubilance. And now? Now I think I'd sooner read Goodnight Moon 17 times in a row (that is a special kind of painful) than make lunch.

If you're a SAHM (stay-at-home mom) or a SAHD (stay-at-home dad), maybe you can relate to this. I don't think I'm overstating it when I say that I now despise lunch with every fibre of my being. I'm not talking about lunch with the girls - the patio, the frosty drink, the toughest decision required being what someone else will cook and serve for me; love those lunches. I'm talking about the everyday lunch. The "Mom, what's for lunch?" lunch. The, "What a lovely morning it's been. I guess it's time to go home and ...<sigh>... make lunch" lunch.